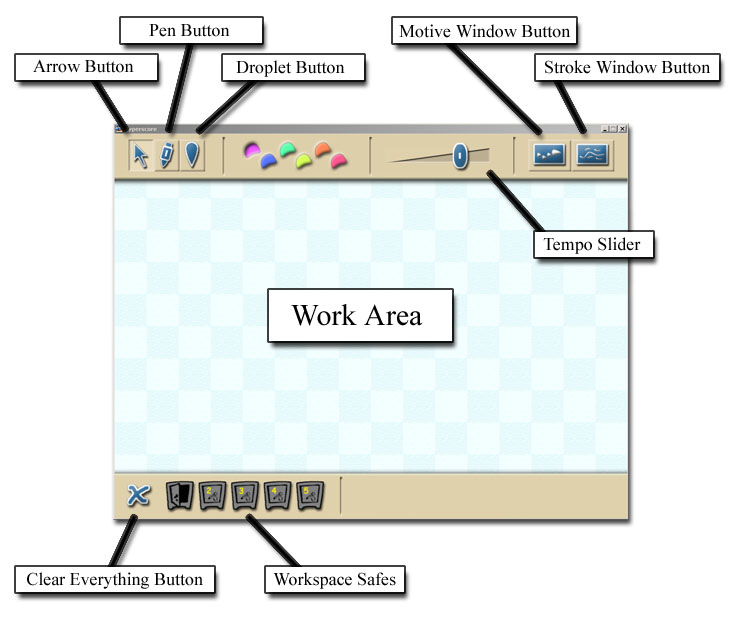
| Figure 1. | A screenshot of Hyperscore with a blank workspace. All the buttons are labelled. |
Hyperscore Tutorial
This tutorial is written to be read by a musically-untrained novice user who has Hyperscore open on his screen, following along with the instructions. We will describe, step by step, how to make a short, simple, and pleasant piece of music using Hyperscore.
1. Starting Hyperscore
When Hyperscore appears you are presented with a blank blue-and-white checkerboard canvas on which you will make your composition. The following figure shows labels for the basic tools in the interface.
You build your music by creating musical objects on this canvas. There are two types of musical objects, Motive Windows and Stroke Windows, and we will quickly explore both in this tutorial to give the user an overview of how the program works. A Reference Guide, to follow later, will carefully describe each feature in a top down order.
|
|
||
|
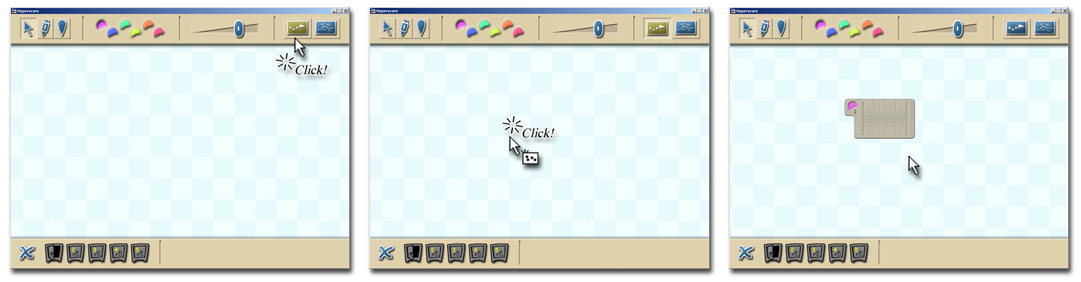
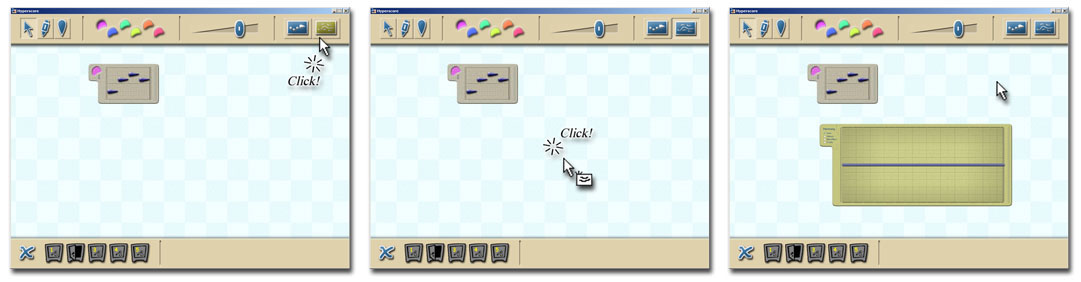
2. Creating a Motive Window
First you should create a Motive Window. Click on the Motive Window Button, and then click anywhere on the checkerboard canvas. A motive window will appear.
 |
||
|
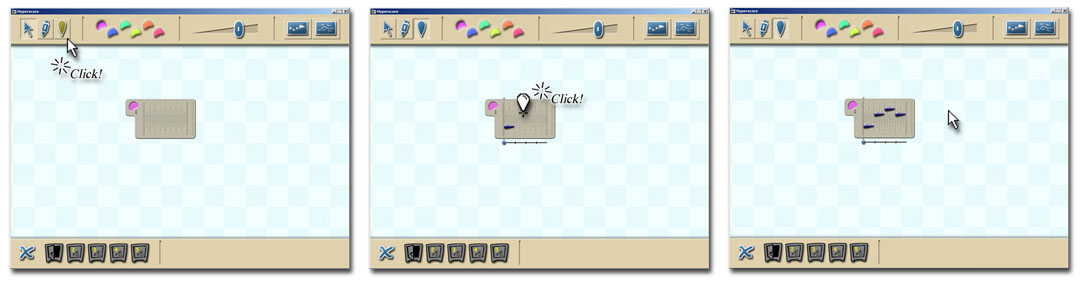
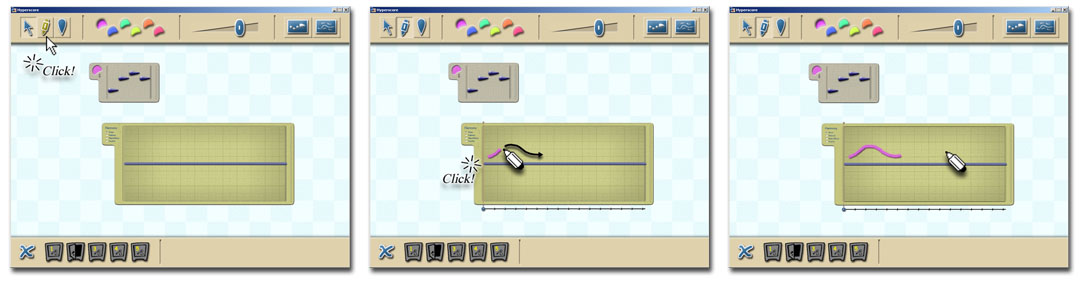
In this window, you can create a short, single-voiced motive. Click on the Droplet Button, and then click a few times on the Motive Window. You will be able to place notes anywhere you want to on the Motive Window, but you can only have one note playing at any given time. Press the space bar to play the motive.
 |
||
|
Move the notes around until you like your motive. Later we'll learn how to edit motives in many ways, including adding notes that are longer or shorter, or making the motive longer or shorter. But first, we'll see how a motive gets used in the other kind of musical object, the Stroke Window.
Notice the pink color blotch on the side of the Motive Window. This means that your motive has been associated with the color pink; in a moment, you'll create a stroke window and layer many copies of these motives together by painting in this color.
3. Panning and Zooming the Canvas
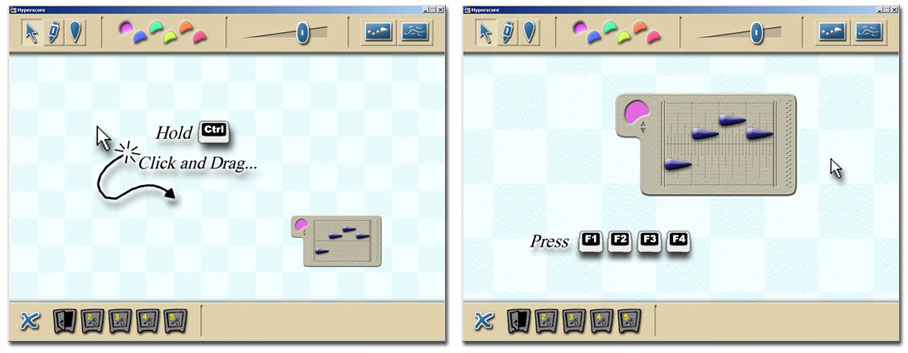
Before you add more content, you should become comfortable with moving around the canvas. You are not limited to the screen real-estate presented when the program first starts up. Hyperscore provides a vast canvas that stretches many screen widths. You can pan your canvas around by holding down the control key, then clicking and dragging with the mouse.
 |
||
|
Hyperscore starts at the F2 zoom level, a level which permits several motives and a good section of a stroke window to be on screen simultaneously, while still displaying all at a resolution sufficient for editing. Precise editing is easier in F1 zoom (shown in the figure), while the F3 and F4 levels permit a large composition to be seen as a whole.
Practice moving your canvas around until you are pretty comfortable with this. Once you're making longer and longer pieces, you'll need to use these keys to move around many screenfulls of your work.
4. Creating a Stroke Window
Next, you can create a Stroke Window. Make some space to fit a Click on the Stroke Window Button, and then click anywhere on the checkerboard canvas. A stroke window will appear. Try to place it next to the Motive Window above.
 |
||
|
On this window, we draw with the pen. Click on the Pen Button, and make sure the pink color is selected in the color swatch -- the color corresponding to the motive. Draw a short straight stroke on the yellow window, as shown. Hit the space bar to play!
 |
||
|
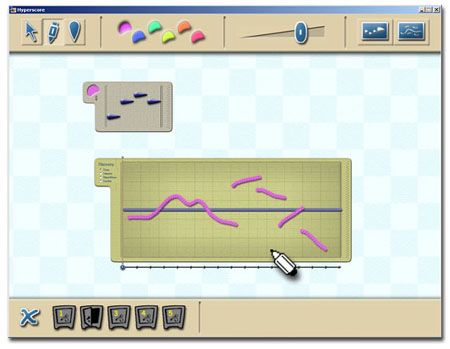
You can move this line up or down with the mouse to change the sound. Moving it lower, lowers the pitch and lifting it higher raises it. You can also reshape the stroke by dragging the stroke with the right mouse button. When you draw a stroke which is curved, up or down, then the motive's contour will change to follow the bends in your stroke. By carefully shaping different strokes, you can get many different patterns out of a single motive!
Notice that each stroke starts playing at the time corresponding to its leftmost endpoint, and stops playing at the time corresponding to its right, so there's no point in drawing strokes shaped like circles, vertical lines, or self-intersecting marks. It makes the most sense for strokes to go from left to right with vertical variations.
 |
||
|
Try these things one at a time, and play the piece after each to see how changing the stroke changes the sound that you hear. Experiment by drawing many lines. Finally, you could also try making another motive and blending different motives together.
5. Timbre and Volume Control
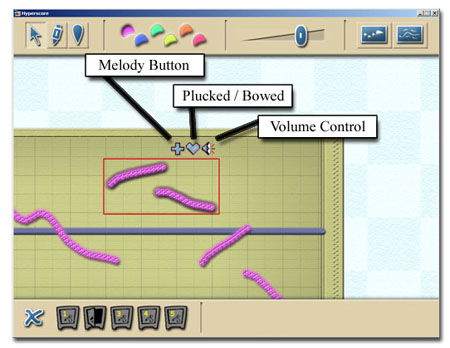
When you want to draw new strokes you must have the Pen Button selected. However, when you have the Arrow Button selected, you can change many things about curves. To try this, select the Arrow Button, then click on a stroke that you drew earlier or drag a rectangle around a group of strokes. A selection rectangle appears around the strokes you selected.
 |
||
|
At the upper right corner of the rectangle several buttons appear which allow you to effect several properties of the selected strokes.
 |
||
|
Click on the bowed/plucked timbre button and observe how the stroke changes appearance, then play the piece and listen to the change in sound.
Next, click and drag upward on the volume icon and see how the stroke becomes thicker or thinner, and listen to the change in volume. Listen to the softest and the loudest you can make a motive.
The final button, the "Melody Button", is relevant only if harmonization is turned on. Harmonization is discussed in the next section, so for now, leave the "Melody Button" untouched. Later, come back and listen to how a stroke harmonizes differently when the "Melody" flag is engaged.
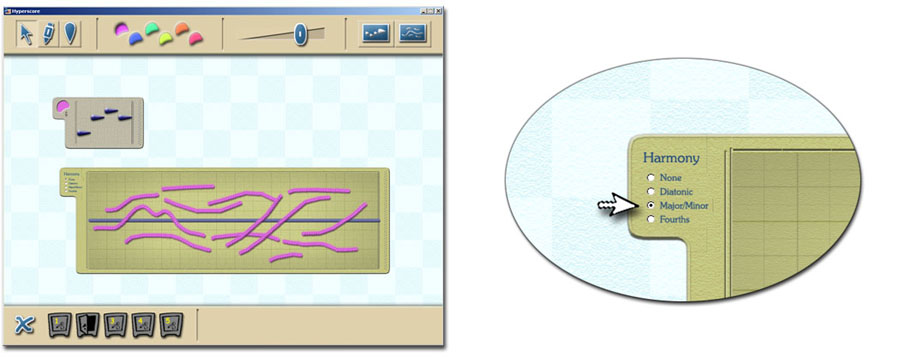
6. Harmony
Now that you know how to draw strokes, bend them, and affect their properties, it's time to look at harmonization, which is a way Hyperscore can change your notes to make them sound better together. To test this, select the Pen Button again and make a lot of strokes, some flat, some curving up or down. Make sure you have several strokes playing most of the time. (When composing with Hyperscore, of course, you will do better if you go slow, and carefully listen to the effect of every stroke you add. Every time you draw a stroke, you should play the music again and listen to hear what you've added, and adjust your marks frequently to make sure it sounds how you want.) But for now, just draw a lot of strokes all at once so we can learn about harmonization.
Once you have all your strokes drawn, press play and listen. It probably sounds like a real mess, with lots of notes playing that don't sound good together. This is because, by default, Harmonization is turned off. It's controlled by those little toggle buttons on the side of the Stroke Window. Switch the Harmonization to "Major/Minor", the third option, and listen to it again.
 |
||
|
Does it sound better? Is it more or less interesting? With harmonization turned on, Hyperscore will make sure most of your notes follow a sequence of chords -- and you can control the chords that it uses using that central dark line that we haven't talked about yet.
When you grab and move the central dark line, called the "Harmony Line", colored regions appear in the background. To begin with, let's listen carefully to the effect of a simple change in the harmony line. Play with the harmony line until you get a single red and green area, then listen to how the notes with this region sound.
 |
||
|
Another thing you can do is create a gray region. The gray regions come where you draw a spiky shape. To make one, take a flat part of the harmony line (click to grab the harmony line and move your cursor quickly right and left to flatten a part of the harmony line), then grab a single point of the harmony line and slowly drag it upward to make a spike.
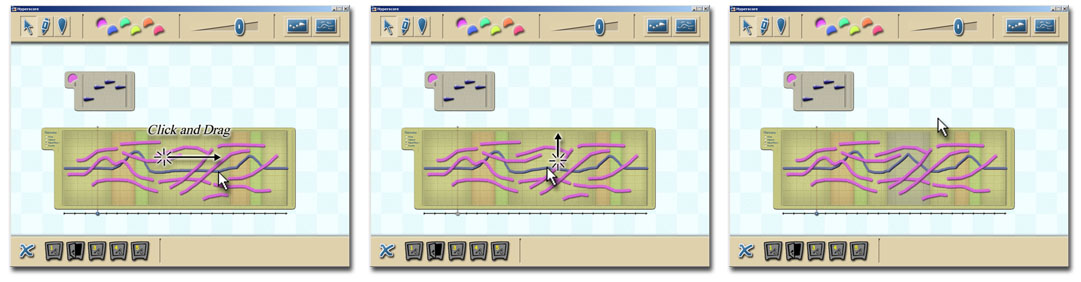 |
||
|
The gray regions change the music's key. This means that the music changes when it passes through the gray region, and then remains changed, in contrast to the red and green regions we tried before. The red and green regions have an effect only where they are, while the grey region affects everything forward of itself until the next gray region.
The taller you make your spike, the greater the extent to which the music changes. Experiment with lots of different colorful regions in your harmony line to add variety to your piece.
7. Explore and Play
Now, you're ready to try making something more complicated. Try adding different motives, try building careful structures of a few motives playing against each other. Duplicate sections to make your piece longer, but add variation at each stage. Remember the trick to composition is to make sure that your listener never gets bored.
Good luck!
* * * *